Sliding door locks are notoriously crappy. Usually it is just one little hook holding the door shut and customers think that hook is going to keep them safe. Well I’m here to tell you that it won’t. Aside from the obvious shattering of the entire door a large screwdriver can pry the door away from the strike. The whole thing is screwed into vinyl usually and it is much less secure than probably every other door in your house.
Enter the Interlock sliding glass door lock. It has two hooks and two vertical rods to keep the door shut. This is ten times better than a regular cheap one hook lock from the hardware store. Unfortunately it is also a pain to replace these and you will have to replace them because despite its good design there are numerous failure points.
This lock uses a cheesy little pinion gear made out of powdered metal. When everything is lined up it will work great but as soon as you get a meathead trying to use that door they will try to force the lock to work even if the vertical rods aren’t lined up with the holes that they are supposed to go into. The meathead may not be aware that there are even vertical rods so we can’t be too harsh with them, for they are used to the lower quality and more forgiving sliding point locks found more commonly in the USA.
I called interlock usa to ask them exactly how one gets their lock out. The receptionist forwarded my call to “tech support” to whom I explained my problem at which point the asshole promptly hung up on me. I immediately called the receptionist back who apologized for patching me in to their computer guy. She then suggested I call some third party company for tech support called GH2 Industries. That company cannot receive incoming calls according to the text message they sent me after I called.
This isn’t my first runaround with Intertek, I’ve spent thankless hours trying to get Intertek USA to support or at the very least point me to replacement parts. I’ve gotten literally nowhere with Intertek so at this point I gave up and decided to start prying the door apart. It came apart fairly quickly.
It turns out that this is probably the way you are supposed to replace this lock anyway. I think they probably would tell you to take the door out of the track so that you can unscrew the top guide for the vertical rod but I just bent the rod and pulled it out, it worked fine after reassembly. So just pry the edge off the side of the door the lock’s hooks come out of, then pull the top rod out, then pry the lock out of the door and disconnect the bottom rod.
Install the bottom rod back into the new lock, push the lock into the door, and reconnect the top rod. You might have to reconnect the top rod before pushing it into the top guide at the top of the door.
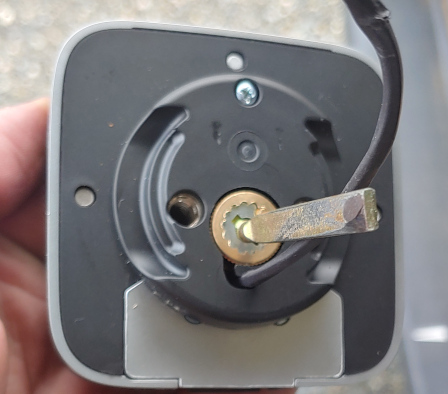
I recommend checking to see if the lock works properly at this point. Obviously the door has to be positioned over the holes in the threshold and ceiling or the lock will jam. Turn the square hub in the lock with a screwdriver and make sure it works before reattaching the trim and snapping the edge of the vinyl door back on. When reattaching the trim make sure that the pinion doesn’t have broken teeth facing the teeth in the handleset or it won’t work. You can rotate the pinion ninety degrees for fresh teeth.
At this point you should have a working door. Tell everybody how to use it before they break it again. Don’t let drunks or idiots or drunk idiots use this door. Though secure when locked it is easy to break while locking it. Good luck…