Why would you do this? Probably because you hate getting locked out or you want to have an electronic lock on the same door but don’t want the appearance to change very much. If you need a key or code to lock your door when outside you are far less likely to get locked out but most mortise locks allow you to push a button to lock the door before walking out and realizing they are locked out. I get a lot of requests from people wanting to install an electronic deadbolt on their front door, but there is already an antique mortise lock installed. There are a few issues to consider for this scenario.
I can easily install an electronic deadbolt above an old mortise lock but eventually somebody will lock the mortise lock and everybody relying on using a code to unlock the deadbolt will be left high and dry. There are a few solutions to this problem but each has drawbacks. You can replace the mortise lock but the replacement options will either be expensive or ugly or both. You can modify the mortise lock to not lock at all, but that is somewhat expensive.
Replacing the mortise lock is probably the most professional approach. The manufacturer of your mortise lock probably makes one with the same hole pattern in a passage function. This is a drop-in replacement that will ensure you don’t get locked out. Mortise lock cassettes usually cost at least $100-200. Expect to pay another $100 for me to come out and install it. The nice thing about this approach is that you can use the same trim, meaning that the lock will look exactly the same on all sides of the door but you can’t get locked out (easily, nothing is impossible).
Replacing the lock with a tubular or cylindrical lock requires modification of the door, either with remodeler plates or a wraparound plate or with extensive carpentry to plug the numerous holes left by a conventional mortise lock with custom cut pieces of wood. The remodeler plates often come only in garish colors like brass and steel.
The slumlord solution which is cheap and effective is to superglue the buttons on the side of the lock and cut the spindle for the deadbolt’s thumbturn on the inside of the door. Then break a key off in the cylinder. This is nearly free and will prevent the mortise lock from locking by all but the most determined person. The mortise lock is deactivated, and the electronic deadbolt above it is the only functioning lock. Not very elegant, but saves some money and the antique lock still looks nice.
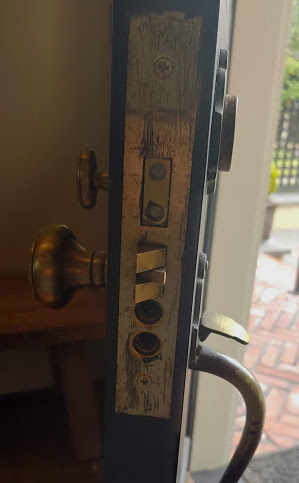
My favorite solution which is for most locks reversible is to take the mortise lock apart and remove the buttons on the side of the lock. Nobody can casually lock the door and walk out unless they lock the mortise lock from the inside and exit via a different door. The deadbolt can be blocked from use by inserting a screw into the strike for the deadbolt.
The lock looks mostly the same and can’t be locked, making the electronic deadbolt the only means of entry on the door. Your antique lock can be returned to full functionality by removing the woodscrew in the strike hole and putting the removed parts back if desired.
Following is a description for how to modify a typical Baldwin mortise lock for passage function. This is not hard to do for somebody who is mechanically inclined. If you screw up it will be hard to put the parts back the way they were. It will void any warranty the lock has. This is a great play to make if your mortise lock is malfunctioning and you don’t want to buy a new cassette too (last ditch hail mary kind of thing).
I am not responsible for what you do with this information, and you should know that this will void Baldwin’s warranty for their mortise lock, though that warranty I believe is only valid if you are the original purchaser of the lock. The directions aren’t going to explain how to take the lock out of the door, if you can’t figure that part out you probably don’t have any business performing this procedure. I will say that you must loosen the set screw for the mortise cylinder, not remove it. Don’t use a wrench to remove the mortise cylinder either. Ok here goes:
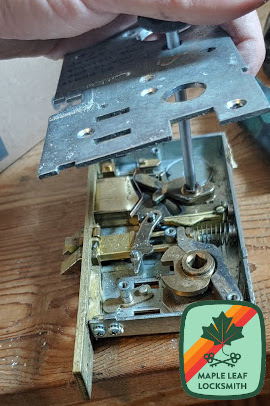
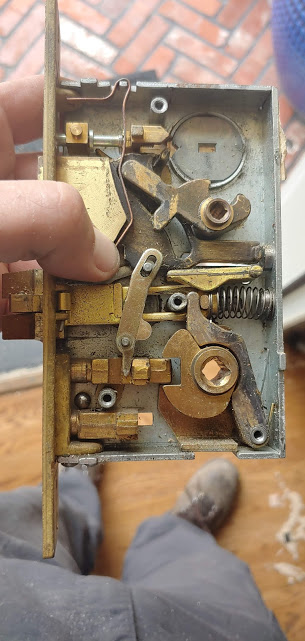
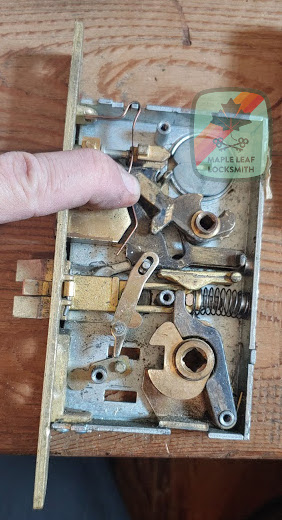
Take the mortise cassette screws out and lift the top off the cassette body. Next is time to remove the buttons on the side of the lock, along with the spring and ball bearing that go with the buttons. Following are before and after pictures of the parts inside the mortise cassette. If you want the deadbolt to still work, your cassette should look like the second one with the buttons removed. The coordinator can remain, without the buttons it won’t do anything.
Ok if you made it this far you either have a working lock or you screwed up somewhere or there is a broken part in your lock that needs replacement. If the former, congratulations. I would charge around $150 to come out and do this kind of job so you saved yourself a lot of money! If you are in the latter camp, you have what I call a shoebox job. Bring the shoebox full of parts in to a walk-in locksmith shop and if they are competent they can reassemble the lock as long as you brought all of the pieces, and maybe even if you did not if they have spare parts.
I’m putting this information here because the economy is crashing and people are hurting financially and need security but don’t necessarily have the money to pay somebody to do this. Let me know if you found this information helpful, I’m going to make a youtube video about this subject in the near future.