There are a few typical failure points for Baldwin thumblatches. The first and most common in my experience is that the springlatch itself fails. This may be because weatherstripping was added after the lock was installed, making it harder to shut the door. There is then a lot of force against the door from the weatherstripping pressing against it; the only object withstanding that force is actually the springlatch and it will fail faster under these circumstances. The door may be sagging and the latch isn’t latching. The set screw on the interior handle may be loose and the knob or lever falling off.
That isn’t what we’re here for today though. We’re here because of another common point of failure: the Baldwin thumblatch assembly, or, more specifically, the teeth on the gears failing. The symptoms of this problem are when you push on the thumblatch and nothing happens. It may also not spring back up after you push on it.
All Baldwin locks used to have a lifetime warranty so don’t take yours apart if you originally bought the lock because it probably voids the warranty to do so. Just call (800)566-1986 and tell them it failed and they’ll send you replacement parts, specifically called the Thumb Depressor Transmission Repair Kit. If you bought a house with one of these locks installed you don’t get the warranty, it doesn’t transfer. You either have to replace the thumblatch (Schlage makes a replacement that is adjustable and should drop right in) or fix it. Or use a different door.
If you’re still reading you must not have a warranty. Your choices are to buy the thumblatch assembly from some place like Builder’s Hardware, buy a drop-in replacement thumblatch from Schlage et al, or fix the existing thumblatch. Good news; if you want to fix it, you probably can without buying anything more. It all boils down to turning a gear 90 or 180 degrees inside the thumblatch and then putting it back together correctly (Update: as of 2023 Baldwin no longer manufactures this gear with teeth all the way around the gear, they are only on one side meaning this fix no longer works and you have to buy parts).
The problem is caused when teeth on a small gear constructed of pot metal break off. The gear’s purpose is to convert downward pressure from the thumblatch into rotational force to retract the spring latch. When the teeth break off, the thumblatch won’t actually do anything when you push down on it and one will feel less resistance than usual since you’re not overcoming the spring power of the latch anymore.
Before you do any of this: I’m only offering this information for the curious. I don’t recommend you do this, and I refuse to accept any responsibility for what you do with this information. Don’t do any of this without wearing a hard hat, full face shield, your phone nearby with your mother on speed dial, etc.
When installed correctly the gear only turns less than 90 degrees. There are 360 degrees on the gear, so at least 270 degrees are still available for your use unless somebody already performed this surgery on your lock already. Fortunately the teeth always break off of the round gear. The teeth on the flat part that interacts with the gear never seem to break. Usually you just have to rotate the gear 180 degrees and get years more service from the thumblatch.
The nitty gritty:
-
-
-
- Unscrew the thumblatch off the door. This will probably require an 1/8″ allen wrench for the interior knob or lever. There may be a through bolt whose head is hidden by a screw cap below the knob; you’ll have to unscrew it to reveal the bolt head. If you’re not strong enough to unscrew with your bare hands use a towel or something with your pliers so you don’t scratch the finish on that screwcap.
- Now that you’ve taken the lock off of the door you should be holding the thumblatch in your hand, hopefully looking something like this:
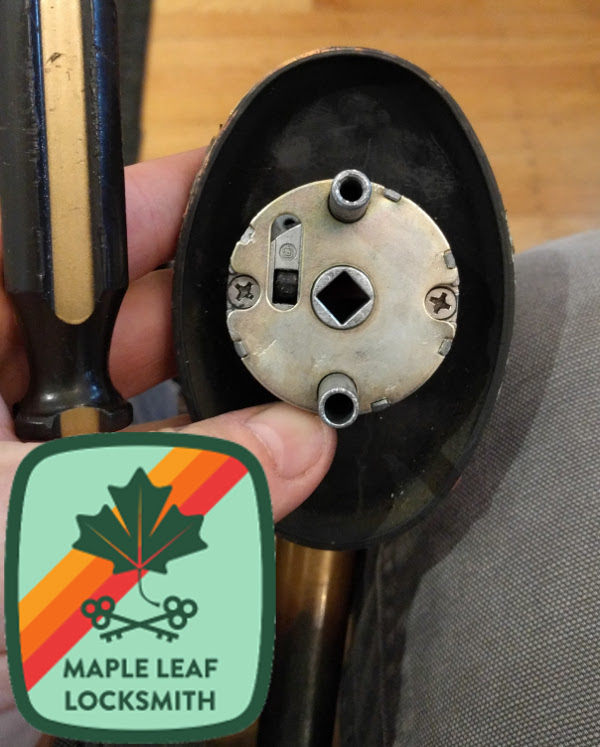
This is the Baldwin thumblatch. There are about six little tabs folded over the plate that covers the internal workings of it. Don’t break them. - Now you have to carefully pry the plate off to expose the broken gear. The plate is held on by six weak bits of pot metal. Don’t try to bend them back, they’ll break. You have to flex the plate itself. I use a large flathead screwdriver under the plate to work it off. Alternatively, if you are made of money you could remove the two Philips screws, take the whole thing off and screw a new thumblatch assembly on, put it back on the door and crack a beer.
- Now you should have the plate off, revealing a mess of broken gear teeth. Hopefully none of the bits of metal holding the plate down broke off. It’s probably okay if you lose one or two of them as long as they aren’t next to each other. Lose too many and you’re probably going to need some JB Weld. Here’s what mine looks like:
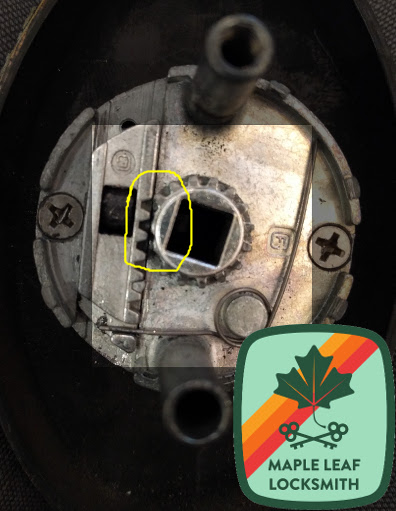
Here’s a closeup of the broken gear with missing teeth, circled in yellow. You can see that without teeth on the entire side, the thumblatch can be pressed and it will slide past the gear without moving it. Thus the latch will not move and the door will not open.
- Now you’re almost done but this step is important. Take that round gear off it’s not held in there by anything. Push the thumblatch up all the way until it stops (that’s the thing you push down on the outside of the door to open it). Now put the round gear back in, but rotated so that the teeth line up with the teeth on the part still in the lock. The square in the middle of the gear should be rotated so that the corners line up with the points of the compass rose. This is the proper timing for the gear. If you don’t assemble in this way, pushing the thumblatch down might not retract the latch all the way and the door will still not open from the outside. Make sure to get the broken teeth out of the way so they don’t get stuck in between the gears once the lock’s back on the door.
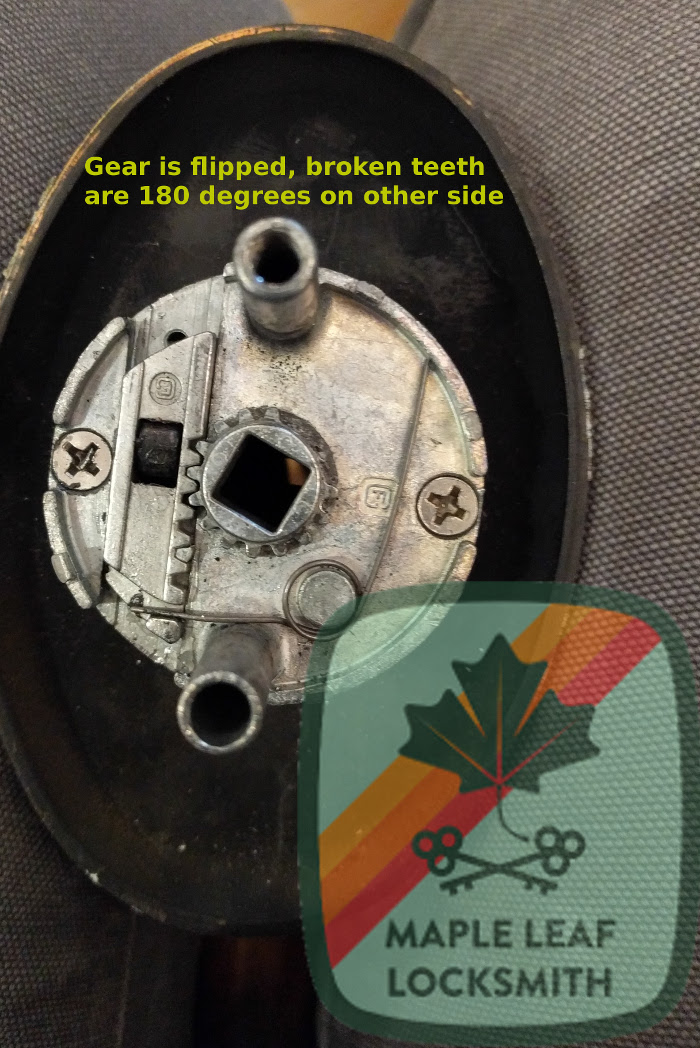
Here we’ve turned the gear 180 degrees to take advantage of fresh gear teeth. Note that the gear isn’t perfectly centered. It should be rotated fifteen degrees or so clockwise so that the edges of the square are on the vertical centerline of the lock. - Once your lock looks similar to the picture above you’re ready to put the plate back on. An easy way to do this is to slide the plate back on to the lock under a few of the tabs, and then tap the other side back on with a screwdriver. It should go back on fairly easily. If you didn’t break off more than a few of the tabs, the plate should now be secured and the handle set ready to put back onto the door.
That’s it. If everything went according to plan and you have a minimum of leftover parts, your thumblatch should be working like new again. You just saved yourself at least $100, maybe up to $300 depending on the finish and style of your thumblatch. Perhaps equally as important, you can open your door again! Congratulations. If you found this helpful you could mail me some of the money you saved. Alternatively you could also just write me a nice review somewhere.
-
-